Starting Necromunda
A Beginner's Guide to the World, Gangs, and Rules
by Djidiouf /@ashenquarter
This tool is my own personal project and is not affiliated with Munda Manager or Games Workshop.
Learn to Play Necromunda
Necromunda is a narrative skirmish game about gangs fighting for territory, power, and survival in the depths of a hive world. You control a small crew of fighters, not a full army, and every battle can leave scars that shape your campaign.
This step-by-step guide walks you through your first games, from opening the box to playing a full campaign.
The Core Mechanics
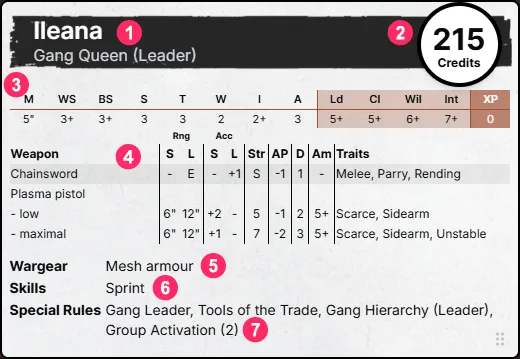
A typical Fighter card for an Escher Gang Leader
Step 1 - Understand Fighter Cards
Each gang is made up of individual fighters, each represented by a miniature and a Fighter card. The card is your main reference for that fighter during the game and across a campaign.
A Fighter card is split into the following sections:
- Name and Rank (Class) - The fighter's name, and whether they are a Leader, Champion, Ganger etc.
- Value (Credits) - The fighter's total value, representing the cost to recruit them and all the equipment they carry.
- Characteristics - The fighter's core stats: Movement, Weapon Skill, Ballistic Skill, Strength, Toughness, Wounds, Initiative, Attacks, Leadership, Cool, Willpower, and Intelligence.
- Weapons - All weapons the fighter is carrying and their characteristics: range, hit modifiers, Strength, Armour Piercing, Damage, and Ammo Roll.
- Wargear - All other gear carried by the fighter.
- Skills - Any skills the fighter has.
- Special Rules - All the rules unique to the fighter.
During a game, keep each Fighter card close at hand, as you will refer to it constantly. In campaigns, Fighter cards are updated to track injuries, new skills, and changes to characteristics as fighters develop over time.
Step 2 - Build a Simple Starter Gang of 500 credits
Choose a Gang here and build a list of 500 credits using a gang builder tool like Munda Manager.
For your first few games, keep it simple:
- 1x Leader
- 1x Champion
- 3x Gangers/Juves/Prospects depending on your gang
It's also a good time to think a little bit about your gang narrative:
- Pick some names for your fighters, that's the best way to start their journey in the Underhive. You'll remember some of their exploits (or failures).
- Write up a small backstory for your gang which is maybe just a bunch of low-lives who are trying to make a buck or prove themselves.
Tips:
- Select only 1 weapon for each fighter and take a weapon only in the following categories: close-combat weapons, pistols, basic weapons
- Take at least one melee fighter (even if it is just a fighter with a knife and attitude)
- Do not spend time picking up Skills for your Leader and Champion, start simple

Step 3 - Understand the Round Structure
Necromunda is played in rounds (also called turns). Each round usually follows:
- Roll for Priority (who acts first this round)
- Action Phase (players alternate activating one fighter at a time)
- End Phase (bottle checks, recovery tests, scenario steps)
The key difference from many wargames: you are not moving your whole gang at once. You alternate fighter activations, which makes every move feel like a response to what just happened.

Step 4 - Learn Activations and Actions
Each fighter starts a round with a Ready marker which indicates it has not been activated yet.
When you activate a fighter, you usually get two actions for them. Some actions can be repeated (simple), some can only be made once (basic), and some count as two actions (double):
- Move (simple) (you get into cover, climb, reposition)
- Shoot (basic) (you shoot at range)
- Fight (basic) (melee attacks if engaged)
- Charge (double) (close the distance with an enemy and allows a free fight action)
- Aim (basic) (set up a better shot)
- Stand Up (basic) (if you were Prone)
- Reload (simple) (tries to reload/unjam your weapon)
Once you activated your fighter, you remove its Ready marker and it's now your opponent's turn to activate a fighter. You'll keep doing that until no fighters are left with a Ready marker.
Tip:
Beginner habit that improves survivability: Move from cover to cover instead of standing in the open and hoping your armour saves you.

Step 5 - Line of Sight, Cover, and Height
A typical board of Necromunda will be packed with terrain, take advantage of it.
- Line of sight is king, if you can't be seen by the enemies, they can't shoot at you and suffer a penalty if they charge you.
- Cover keeps fighters alive. A good cover makes you harder to be hit by enemies.
- Height is powerful, but it makes you a target. High ground is a trade.
- Ladders, gaps, and climbs slow you down or put you at risk. Plan your routes.
Tip:
If you only learn one thing early, learn this: a good shot is one taken from cover or a safe angle, where your opponent cannot easily retaliate.

Step 6 - Shooting Basics
When you do a Shoot (basic) action, the shooting sequence goes like this:
- Choose a target you can see
- Check your weapon's range
- Apply modifiers (range accuracy, cover, aiming...)
- Roll to Hit
If a fighter has a BS of 4+ and no modifiers need to be applied, the roll is a success if you roll a 4 or more on a D6. - Roll the Ammo Dice
- On an Out of Ammo result, roll a D6 using the weapon's Ammo value to see if it is jammed.
- If the roll fails, the shot still resolves normally, but you must take a Reload (Simple) action before the weapon can be fired again.
- Some weapons have the Rapid Fire (1) trait. When using these weapons, each bullet symbol on the Ammo dice counts as a separate hit.
- Resolve Successful Hits (see Step 7: Resolve Hits)
- If the hit is a success, the fighter is Pinned. Put Prone the enemy fighter (if they survive the hit)

Step 7 - Close Combat Basics
Melee is brutal and fast.
- Positioning matters because you need to get into engagement.
- A Charge (Double) is often how you start a fight.
- Multiple fighters dogpiling one target can happen and makes the combat more deadly.
Early on, expect melee to feel swingy. That is normal. Lean into it, it is part of the drama.
When you do a Fight (basic or free if you charged) action, the combat sequence goes like this:
- Choose up to 2 Weapons
- Determine how many Attacks you can make
Look at your fighter profile for the Attack characteristics.
Add +1 if you charged
Add +1 if you're using a second weapon - Choose a target
- Roll to Hit
Distribute your number of attacks as equally as you can between your weapons.
If a fighter has a WS of 4+ and no modifiers need to be applied, the roll is a success if you roll a 4 or more on a D6. - Resolve Successful Hits (see Step 7: Resolve Hits)
- If the hit is a success, the enemy fighter isn't Pinned and does not go Prone. They stay standing as long as they are engaged.

Step 8 - Resolve Successful Hits
If the hit you've made is a success, it's time to see if that hit is going to wound the enemy fighter.
- Roll to wound
Compare your weapon's strength to the enemy fighter's toughness.
For Close Combat Weapons, the Strength of the weapon is often marked as `S`. It means that this weapon has a Strength equal to the Strength of the fighter.Strength vs Toughness D6 Roll Required Strength is TWICE the Toughness or greater? 2+ Strength is GREATER than the Toughness? 3+ Strength is EQUAL to the Toughness? 4+ Strength is LOWER than the Toughness? 5+ Strength is HALF the Toughness or lower? 6+ - Armour save, if any (only if the wound roll is a success)
If the enemy fighter has some armour, for example, a mesh armour which provides a 5+ save, they roll to see if the wound is actually applied. If they succeed, ignore the wound. - Apply the Damage of the weapon
If the wound is not saved, the fighter loses a number of wounds equal to the Damage of the weapon (check the Weapon's Damage characteristic and the enemy fighter's Wound characteristic).
If a fighter loses all their Wounds, they fall Prone and become Seriously Injured. Most leaders and champions have 2 wounds, which means they can lose one without being Seriously Injured, while normal fighters only have 1 Wound.
Tip:
Do not stress about every modifier like a Weapon's Armour Piercing on your first games. Play a couple of battles with the basics, then layer in more mechanics.

Step 9 - Pinning, Seriously Injured, and Coup de Grace
These mechanics shape games more than raw damage.
- Pinned fighters lose momentum and can get trapped in bad positions. A fighter who wants to get up when they are activated, will have to spend one of their 2 actions doing a Stand Up (Basic) action.
- Seriously Injured fighters can bleed out at the end of each round if they are Seriously Injured. They are also exposed to being killed very easily in melee.
- Coup de Grace (Simple) is a special action a fighter can do when they reach a Seriously Injured fighter. If preceded by a Fight action, the action is free to do. When a fighter suffers a Coup de Grace, they go Out of Action and are removed from the board.
In Necromunda, controlling the board and pinning key threats can be just as decisive as causing injuries.

Step 10 - End Phase: Bottle tests, Recovery, and Rally
Necromunda is brutal. When things go badly, your gang might lose their cool.
The End Phase includes the following steps:
- Bottling: As your fighters go down, you will make checks to see if your gang bottles.
Each player rolls a D6 and adds up to the result the number of fighters they have who are currently Seriously Injured or went Out of Action during the game. If this number is higher than the number of fighters they have for the battle, their gang bottles. - If your gang has bottled: your fighters may flee.
For each of your fighters, roll 2D6, if you roll equal or higher than their Cool characteristic, your fighter stays on the board. Otherwise, they are removed.
Once your gang has bottled, there is no going back, you'll have to keep making those tests during the End Phase of each subsequent rounds. - Recovery: for each of your Seriously Injured fighter, roll an Injury Dice and apply the appropriate result. If you're lucky, they might get out of being Seriously Injured and get back into action!
| Injury Result | Effects on the fighter |
|---|---|
| Flesh Wound | Not seriously injured anymore but lose 1 Toughness |
| Serious Injury | Stays Seriously Injured and lose 1 Toughness |
| Skull | Is Out of Action and is removed from the board |
Tip:
Bottling is not a punitive mechanic. It is a pressure valve that stops games from dragging on when one side is clearly losing. You can even choose to bottle out voluntarily, which is often the safest option if you want to live another day.
Start Playing!

A Simple Learning Plan in 3 Games
If you want a smooth ramp:
- Game 1: Play Border Dispute with a crew of no more than 3 fighters. Movement and Shooting only, no Tactics cards, no Bottle tests. Don't worry about rewards like XP, credits and reputation.
- Game 2: Add Combat and Bottle tests.
- Game 3: Add Post-battle steps and start tracking XP and Lasting Injuries properly.
After that, start adding more rules: Skills, Terrain rules, and all the weird stuff that makes Necromunda feel like Necromunda.

Play Your First Scenario
For your first games, choose a simple scenario:
- Clear deployment zones
- Low numbers of fighters
- Simple rules and objective (grab loot, hold points, break the enemy)
Some good first game scenarios (remember to lower the number of fighters):
- Border Dispute: each gang is seeking to secure their Turf and drive off the other gang – and the best way to do this is to defile the other gang's relic.
- Smash & Grab: one gang aims to steal some loot caskets the other gang has been paid to protect.
- Tunnel Skirmish: Two gangs meet in neutral territory and a firefight ensues.
A good first goal is: finish a full game, even if you forget a rule or two.

Deploy your Crew and roll for Priority
- Each player chooses their fighters who will participate in the scenario
- Deploy your fighters in your deployment zone
The Standard deployment zone is the zone which is more than 12" from the middle of the board. - Roll for Priority (each player rolls a D6 to determine who acts first)

After the Battle
This is where Necromunda really shines and is a game you come back to!
After a battle you will usually have some rewards:
- Gain experience for your fighters that can be spent on Advancements
- Earn credits to buy new Equipment, hire new Fighters
- Earn Reputation (the more reputation you have, the better Equipment you can access to and the more Brutes you can hire)
- Update your Arbitrator about your battle
- Write up a battle report narrating the game or how your gang is doing.
- Update your gang list, and campaign progress
The campaign system is the backbone of Necromunda. Battles matter because they change what your gang becomes. The more focus you put on narrative, the more you'll enjoy the game.

Common Beginner Mistakes (And How to Fix Them)
- Standing in the open: always end actions in cover if you can.
- Splitting your gang: stay close enough to support each other.
- Overbuying fancy gear: more bodies and basic weapons often win early.
- Ignoring objectives: Necromunda scenarios are not always "table the enemy".
- Forgetting vertical movement: plan climbs and drops before you commit.
- Keeping your fighters next to each other: space out your fighters to avoid having them all hit at once by some weapons.

